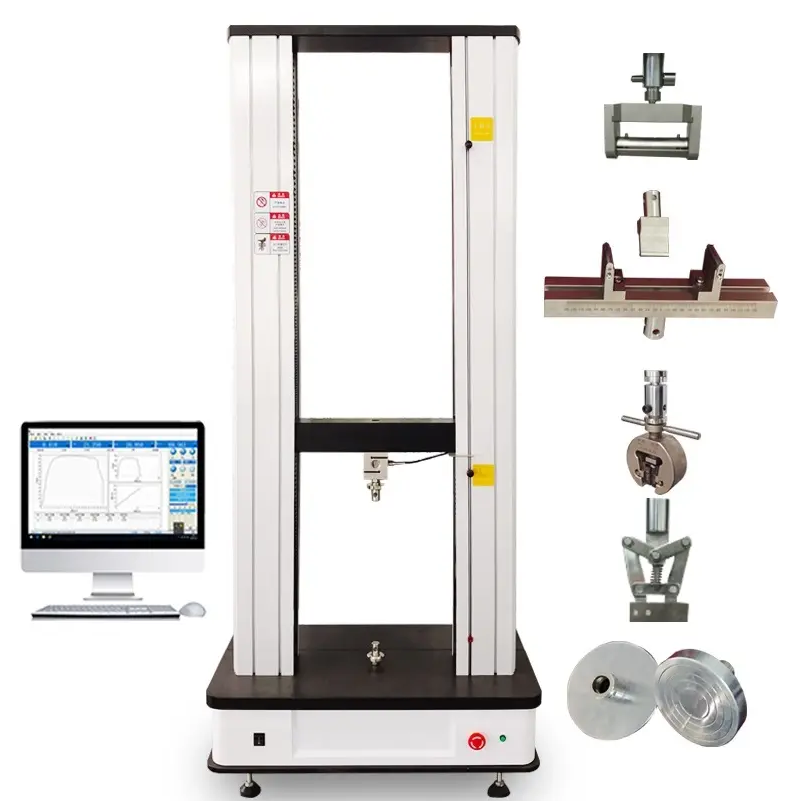
100KN Universal Tensile Testers, Computerized Tensile Testing Machine, Material Tensile Strength Testing Equipment
A Universal Testing Machine (UTM) is used to test both the tensile and compressive strength of materials. Universal Testing Machines are named as such because they can perform many different varieties of tests on an equally diverse range of materials, components, and structures. Most UTM models are modular and can be adapted to fit the customer’s needs.
Universal Testing Machines can accommodate many kinds of materials, ranging from hard samples, such as metals and concrete, to flexible samples, such as rubber and textiles. This diversity makes the Universal Testing Machine equally applicable to virtually any manufacturing industry.
The UTM is a versatile and valuable piece of testing equipment that can evaluate materials properties such as tensile strength, elasticity, compression, yield strength, elastic and plastic deformation, bend compression, and strain hardening. Different models of Universal Testing Machines have different load capacities, some as low as 2 kN and others as high as 3,000 kN.
Test Standard
Tensile Test: ASTM D882 ASTM D 638 / ISO 527-1/2
Bend Test ISO-178 / ASTM D 790
Tear Test:ASTM D 624
Peel Test : ASTM D 3330
Compression Test : ASTM D 659
Application Ranges: This machine is commonly applied in material analysis in auto-parts, fastener, aerospace, cable and wire,plastic and rubber, paper packing industries.
Price: Request Quotation
| Model | HJ-429 |
|---|---|
| Maximum Force | Optional Within 100KN |
Description
Contact Us:
Email : sales@qmnequipment.com
Contact : 1-647-724-2966
It is mainly suitable for testing of metal and nonmetallic materials, such as rubber, plastic, wire and cable, optic fiber cable, safety belt, belt, leather composite belt, plastic section, waterproof roll, steel pipe, copper,sectional material, spring steel, bearing steel, stainless steel (and its high hardness steel), castings, steel plate and steel.Extrude, compression, bending, shearing, stripping, tearing, two-point extension (with additional extensometer) and so on. The machine is designed by mechanical and electrical integration,which is
mainly composed of force sensor,transmitter, microprocessor, load driving mechanism, computer.It has a wide and accurate loading speed and force range.It has high precision and sensitivity for the measurement and control of load and displacement.It can also carry out the automatic control test of isokinetic loading and constant velocity displacement.The floor type model and the painting process fully considered the principles of modern industrial design and ergonomics.
Host features:
The import photoelectric encoder is used to measure the displacement. The controller adopts the embedded single chip microcomputer structure, and the powerful measurement and control software is built in. It integrates the functions of measurement, control, calculation and storage. It has the function of automatically calculating the stress and elongation (to add the extensometer), tensile strength and modulus of elasticity, automatic statistical results, automatically recording the force value or elongation of the maximum point, breaking point, the specified point, the dynamic display of the test process and the test curve by the computer, and the data processing, after the end of the experiment. The data can be reanalyzed and edited by the graphic processing module for curve magnification, and the reports can be printed. The performance of the products reaches the international advanced level.
| Accuracy grade | 0.5 class |
|---|---|
| Test speed range | 0.01~500mm/min |
| Accuracy grade | 0.5 class |
| Effective force measurement range | 0.4%~100%(0.5 class) |
| Force measurement precision | Within±0.5% |
| Load cell Basic configuration | pull and pressure sensor (maximum load) 2. Extended configuration 3. multiple sensors can be added |
| Effective test width | 425mm(can be widened according to customer requirements) |
| Effective stretch space | 900mm(can be higher by customer requirements) |
| Displacement measurement accuracy | Within±0.5% |
| Deformation measurement accuracy | Within±0.5% ((large deformation or small deformation can be selected according to customer requirements) |
| Safety device of the Test Bench | Electronic limit protection |
| Test bench return function | Manual or automatic return to the initial position of the test at the highest speed |
| Fixture configuration | A set of tensile fixture |
| Mainframe size | 910*660*2100mm(Width * Depth* Height) |
| Dynamic system Servo motor | high precision ball screw |
| Power supply | 220V/50HZ or Universal |
| Host weight | About 398Kg Control system |
| Motion | Double use of pull / pressure function |
|---|
Testing platform:
The microcomputer hardware platform can accurately collect and process data in real time. The interface of measurement and control is gentle, intuitive, clear, and easy to operate.
Test force measurement:
Load measurement: high precision spokes load sensor and high performance measuring and amplifying system are adopted to ensure the high resolution of the test force. Multiple sensors can be configured according to user needs to achieve wide range of test forces. Displacement measurement:using the 2500P/R high precision photoelectric encoder and the precision screw coaxial rotation, through the digital circuit to realize the weighing power control system. The full digital servo controller is used to control the high performance step motor drive synchronous gear belt and drive the precision screw drive with two pairs of high precision without gap.It has the characteristics of stable load,good low speed performance, no gap, high transmission efficiency,low noise and smooth transmission.
Deformation measurement system
The large deformation measurement system can be selected according to the requirements of the test standard.
Protective Device:
According to different tests, the position of the limit protection switch can be adjusted to prevent the collision of the clamp effectively. It has the protection function such as overload, over current, leakage of electricity and so on.
Equipment Function
1. Automatic zeroing
2. Auto return
3. Automatic disk saving
4. The testing process, measurement, display and analysis are all finished
by microcomputer
5. The data and curves are displayed dynamically with the experimental
process.
6. Experimental results can be re analyzed with arbitrary access.
7. After the test is completed, the force and deformation data of the test
curve can be found at point by point.
8. Program control and mechanical dual protection function;
9. Overload protection function;
10. Emergency shutdown function;
11. The tensile, compression, bending, shearing, adhesion, stripping and
tear tests of the material can be carried out.
WHY CHOOSE US
Quality Assurance: With QMN Equipment, you’re guaranteed to receive products that meet the highest standards of quality and reliability.
Competitive Pricing: Despite the advanced technology and superior quality, our products give you the best value for your investment.
Wide Range of Products: From hardness testers to universal testing machines and NDT/Ultrasonic technologies, our extensive portfolio ensures you have access to a diverse range of products.
Customization: We offer customized solutions tailored to your specific testing requirements, ensuring you get the most effective tools for your applications.


