Metallographic Sample Preparation Equipment: A Complete Selection Guide
Metallographic sample preparation equipment determines whether a laboratory observes the material’s real microstructure or artifacts created during preparation. A powerful microscope cannot correct a section that was overheated, a poorly supported edge, or deformation left behind by an incomplete grinding sequence. The equipment should therefore be selected as one connected workflow rather than as isolated machines.
Write down what the prepared surface must reveal before comparing equipment. Routine grain structure, coating cross-sections, weld zones, inclusions, porosity, decarburization, case-depth profiles and failure features can require different specimen locations and preparation controls. The desired observation also determines how important edge retention, flatness and relief control will be.
ASTM E3-26 is the current ASTM guide for preparing metallographic specimens. It emphasizes the importance of selecting and preparing a representative specimen for optical or scanning electron microscopy. It is a guide rather than a universal recipe: different materials and examination problems can require different techniques.
List the materials and hardness range your laboratory expects to handle, the largest starting section, the smallest feature that must be preserved, daily specimen volume and downstream analyses. Include whether the same surface will be used for microhardness testing. These details create a purchasing specification that suppliers can evaluate.
The preparation chain
1. Section
Take the required orientation while limiting heat and deformation.
2. Mount
Support the specimen and preserve the area of interest.
3. Grind
Remove sectioning damage and establish a flat surface.
4. Polish
Reduce deformation and prepare the surface for examination.
Each stage must remove or control the effects of the previous stage; this workflow is not a test result.
Select a cutter around the specimen and the damage you must control
Sectioning creates the first prepared surface, so cutter selection should consider more than whether a wheel can pass through the part. Review the specimen envelope, material type, section location, clamping access and the amount of stock that can be removed later. The operator must be able to position the area of interest without creating a safety or repeatability problem.
Heat and mechanical deformation introduced during cutting can obscure the original microstructure. A suitable abrasive wheel, controlled feed and effective coolant help manage these effects. The QT-Q-2A cutter is listed with a manual feed, specimen clamping and continuous coolant circulation. Confirm the wheel options, usable cutting capacity, electrical supply and coolant system for the proposed materials before ordering.
Ask for a demonstration on a representative hard or awkward specimen. Inspect the cut face for burning, distortion and excessive burr formation, then determine how much grinding is needed to remove the affected layer. A rapid cut is not an advantage if it adds rework or compromises the feature being examined.
Decide when mounting is necessary
Mounting makes small or irregular specimens easier to hold and can support edges, coatings, pores and delicate features during grinding and polishing. It also helps create repeatable specimen geometry for fixtures or automated holders. Large, convenient specimens may not need mounting, so the workflow should not add the step automatically.
Hot compression mounting is useful when the specimen and examination objective tolerate the selected temperature and pressure. Cold-mounting systems may be more appropriate for heat-sensitive, porous or geometrically difficult samples. Resin choice affects edge retention, shrinkage, conductivity and compatibility with later examination.
QMN’s QT-XQ-2B mounting machine is described for thermosetting resin, with controlled heating and mechanical pressure. Before purchase, confirm mold sizes, heating and cooling cycle controls, compatible consumables, extraction needs and the expected specimen throughput. A mounting press alone does not cover cold-mounting applications.
Match the grinder-polisher to workload and repeatability
Grinding removes sectioning damage and produces a flat surface through a controlled abrasive sequence. Polishing then reduces scratches and deformation so that microstructural features can be evaluated. Skipping too far between abrasive stages may leave damage that reappears after final polishing.
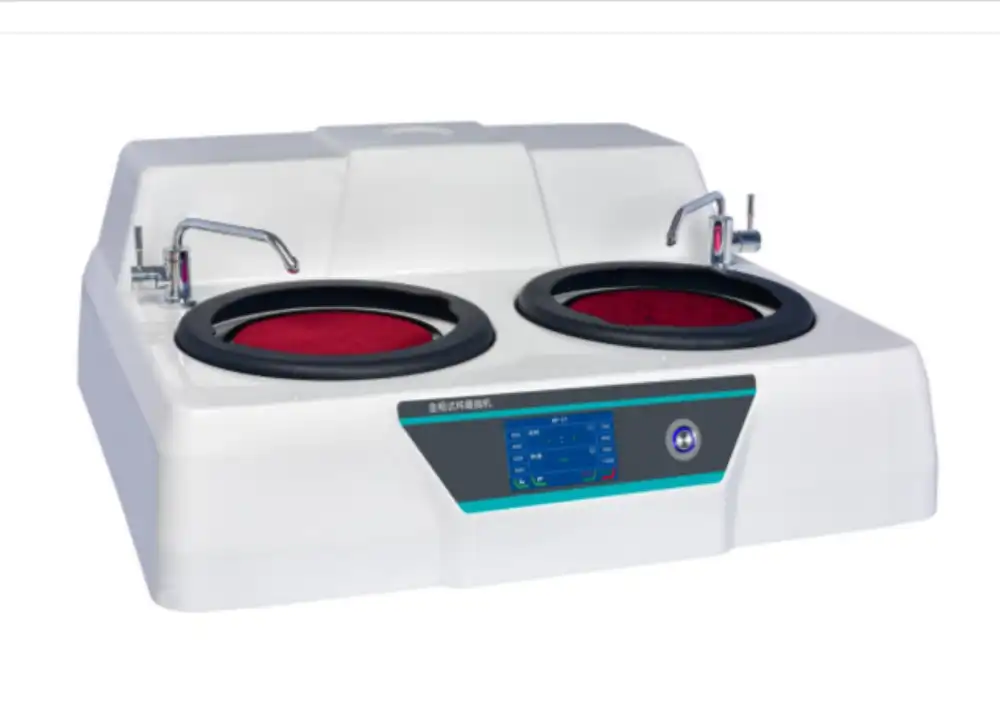
For lower volume or varied one-off work, manual control can be practical when experienced operators are available. Higher or repetitive volume may justify specimen holders, programmed steps and automated dosing to reduce operator variation. Dual platens can also support two preparation stages or multiple users without constant surface changes.
The QT-MP-2T grinder-polisher is listed with dual platens, touchscreen control, variable speed, bidirectional rotation and integrated cooling. Confirm platen dimensions, specimen-holder compatibility, water and drain connections, splash control, available automation and consumable sizes. Do not assume an optional feature is included unless it appears in the final quotation.
Equipment-selection checklist
Station
Confirm before purchase
Typical warning sign
Cutting
Capacity, clamp access, wheel range, coolant and power
Burning, burrs or excessive removal needed later
Mounting
Mold sizes, resin types, cycle control and extraction
Gaps, shrinkage or unsupported edges
Grinding
Platen size, speed control, cooling and holders
Persistent deep scratches or loss of flatness
Polishing
Cloths, abrasives, dosing options and cleaning
Relief, smearing, pull-out or embedded abrasive
Qualitative purchasing guidance; the suitable method must be validated for the material and examination.
Plan consumables at the same time as equipment
A preparation line cannot operate consistently without matched consumables. Include sectioning wheels, coolant, mounting compounds, molds, grinding papers or discs, polishing cloths, abrasives and lubricants in the initial plan. Ask which items are supplied with the machine and which must be ordered separately.
Consumption depends on material mix, specimen size, preparation method and workload, so avoid accepting an unsupported annual estimate. Run representative samples, record consumption and set reorder points from actual use. Confirm local availability and lead time for frequently replaced items; a machine that is operational but missing one proprietary consumable still stops the workflow.
Cross-contamination control also matters. Define cleaning between materials and decide whether selected platens, cloths or containers should be dedicated to particular alloy groups or analysis needs. Labeling and storage should protect consumables from mixing, drying or contamination.
Evaluate preparation quality, not only machine operation
An equipment acceptance demonstration should produce prepared specimens, not merely show that motors and controls turn on. Select samples representing routine and difficult work. Document the sectioning, mounting, grinding and polishing sequence so another trained operator can repeat it.
Examine the unetched surface first for scratches, edge rounding, relief, pull-out, embedded abrasive and smearing. Then apply the appropriate examination procedure. If an artifact appears, trace it back through the sequence rather than immediately extending final polishing; additional polishing cannot always remove damage created much earlier.
Where specimens will undergo microhardness testing, confirm that the preparation produces the required flatness, finish and support for the applicable test method. Preparation quality and hardness-equipment performance are separate controls, and both need verification.
Specify utilities, safety and maintenance
Before issuing a purchase order, verify electrical service, water supply, drainage, ventilation, bench or floor space, equipment weight and access for installation. Review guarding, emergency stops, splash containment and the safe handling of cutting fluids, mounting compounds, abrasives and etchants. Follow the equipment manuals and applicable workplace requirements.
Build routine cleaning and inspection into the workflow. Cutting chambers, coolant tanks, drains and polishing stations can accumulate debris. Define responsibilities for fluid checks, filter or coolant maintenance, platen cleaning and inspection of clamps, guards and moving parts. Record maintenance that could affect preparation quality.
When requesting a metallographic equipment quotation, provide materials, specimen dimensions, daily volume, desired mount sizes, examination objectives, available utilities and automation preferences. Ask for an itemized package covering machines, initial consumables, accessories, documentation, installation and training.
Frequently asked questions
1. What equipment is needed for metallographic sample preparation?
A typical workflow can require sectioning, mounting, grinding and polishing equipment, followed by microscopy or another examination. The exact package depends on specimen size, material, preparation sensitivity, throughput and whether mounting is necessary.
2. Does ASTM E3 specify one fixed grinding and polishing recipe?
No. ASTM E3 is a preparation guide, and the suitable technique can vary with the material and examination objective. Laboratories should document and validate the sequence used for their specimens rather than assuming one recipe fits all materials.
3. When should a metallographic specimen be mounted?
Mounting is useful when a specimen is small, irregular, difficult to hold, or needs support at an edge or feature. Heat- or pressure-sensitive specimens may need a cold-mounting approach instead of hot compression mounting.
4. Is a dual-platen grinder-polisher better than a single-platen machine?
A dual-platen system can improve workflow by keeping two surfaces available or supporting multiple users. The benefit depends on volume, preparation steps, space, utilities and cleaning practices; it does not by itself guarantee a better prepared surface.
5. What should be included in a metallography equipment quotation?
Request the machine configuration, compatible holders, molds, utilities, safety accessories, initial consumables, manuals, installation, training, warranty and service details. Confirm optional features and consumables individually in the final quotation.
A practical guide to selecting and using a ferrite meter for stainless-steel welds, covering Ferrite Number, probes, calibration, surface effects and inspection records.
A practical guide to selecting metallographic cutting, mounting, grinding and polishing equipment, including consumables, utilities, workflow and preparation-quality checks.
Compare Leeb and UCI portable hardness testing by component rigidity, surface condition, material calibration and reporting requirements, with a practical equipment-selection checklist.
Choose a Charpy impact tester around your test methods, energy range and laboratory workflow. Review specimen preparation, installation, verification and the complete purchasing package.